
 I wasn't really pleased with the flower made with the vitrail beads, so, I made three more of them to use up most of the petals. Beauty in numbers. What I discovered was that it wasn't the flower I didn't like, it was the photograph. While the strings (fifty beads) usually divide evenly with half of the cupped side being vitrail and half not, this one was one bead off. I knew I wanted to make a bracelet as the next logical project, and I like my bracelets to have five elements. So...I needed another flower. What better than the flower made from leaf beads.
  I chose leaf beads with a marea coating and chose five that read pretty much as silver instead of ones that would more closely match the vitrail coating on the petal beads. I had already decided that I wanted blue as the main color in the finished bracelet, and that I would use silver as one of the supporting colors.
  I also knew that I wanted the center flower to be larger, but not completely different than the others. Since I had six cupped beads with the blue glass showing rather than the vitrail, I used this side for the second layer of petals. To accomplish this, I had to add a round of the 8/0 beads without stepping up, just as I did on the flower power ones.
I next made a bracelet base with the blue 8/0 seed beads I used in the center flower. It's highly likely that none of it will actually show once I add the embellishments, but it still supports my color choice. I'm using the 8/0 seed beads because I've found that if I use 6/0s or 5/0 triangles, I put on so much embellishment my flowers are hard to find, like the "Secret Garden" bracelet shown below.

After I finished the base, I marked the position of the flowers with a Sharpie marker.

Then I placed the flowers over the marks to be sure I liked how it was developing. When I make these flowers for a bracelet, I don't end the thread so I can use it to attach them and to add the embellishment. I use the makeup sponges to house the needle and store the thread. I wish I could remember who suggested this to me. I was using foam hair rollers which also work well, and I know that Jelcy Romberg was the one who passed that trick along to me.

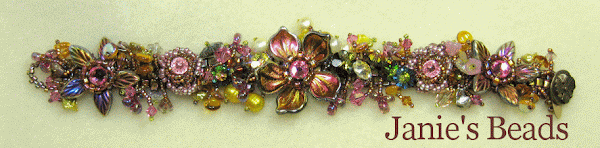
 I sew the flowers to the base by going through the bottom row of petal beads one petal at a time and working through the 8/0s, thus I sew through a petal, through an 8/0, through the next petal, through an 8/0...until all five petals are attached. Then I wind the thread up again until I'm ready to add the embellishment and attach the next flower. Oh, yes, I used blue C-Lon doubled for the flowers because I wanted to match the clear blue glass, and I used 6lb crystal fireline doubled for the bracelet base because it was handy and I couldn't find the spool of C-Lon.
 So, I attached the flowers starting from the left and working to the right, placing each carefully on the dot before I started sewing. And, as usual, they got closer together as I moved across the bracelet, but when I wear it, no one will notice, especially with the embellishment. That's the working rationalization for this bracelet.

Tomorrow I'll add the embellishments and finish the bracelet. (I think I'll start saying "In the next post" instead of tomorrow.)
thank you!!
ReplyDelete